Microsoft 365 Tenant Onboarding – End-to-End Administrative Guide
This document is intentionally long, explicit, and procedural.
It reflects real screenshots captured from a live Microsoft 365 tenant, in the exact sequence they appear during onboarding.
The objective of this block is to:
- Establish a clean tenant foundation
- Validate subscription and billing
- Add and verify a custom domain
- Begin user provisioning
This is a mandatory prerequisite before any Copilot Studio or Power Platform work.
Architectural Context (Before We Begin)
Microsoft 365 is not “just email”. It is a tightly integrated platform consisting of:
- Microsoft Entra ID (Identity & authentication)
- Exchange Online (Email and calendaring)
- Microsoft 365 Admin Center (Control plane)
- Power Platform (Low-code + Copilot)
- Dataverse (Backend data layer for Copilot & automation)
Every step below changes the state of one or more of these components.
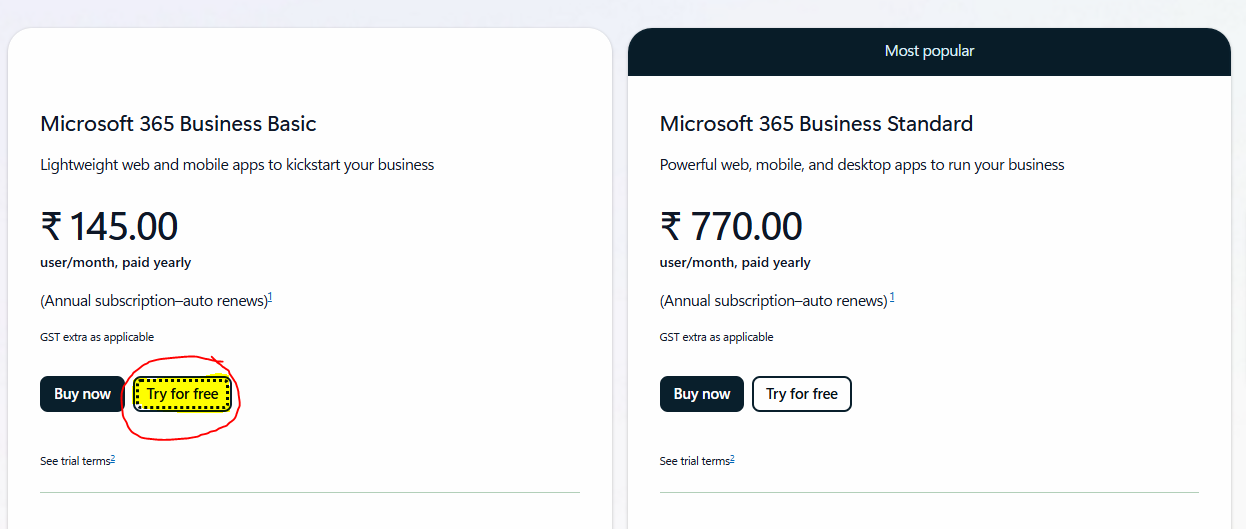
STEP 1 – Starting Microsoft 365 Business Basic Subscription
Navigation
- Admin Center → Billing
- Click Purchase services
Selected plan
- Microsoft 365 Business Basic
- Trial subscription
Why this plan is chosen
- Lowest cost
- Enables Exchange Online
- Allows Copilot Studio UI access
- Sufficient for PoC environments
STEP 2 – Creating a Dedicated Admin Identity
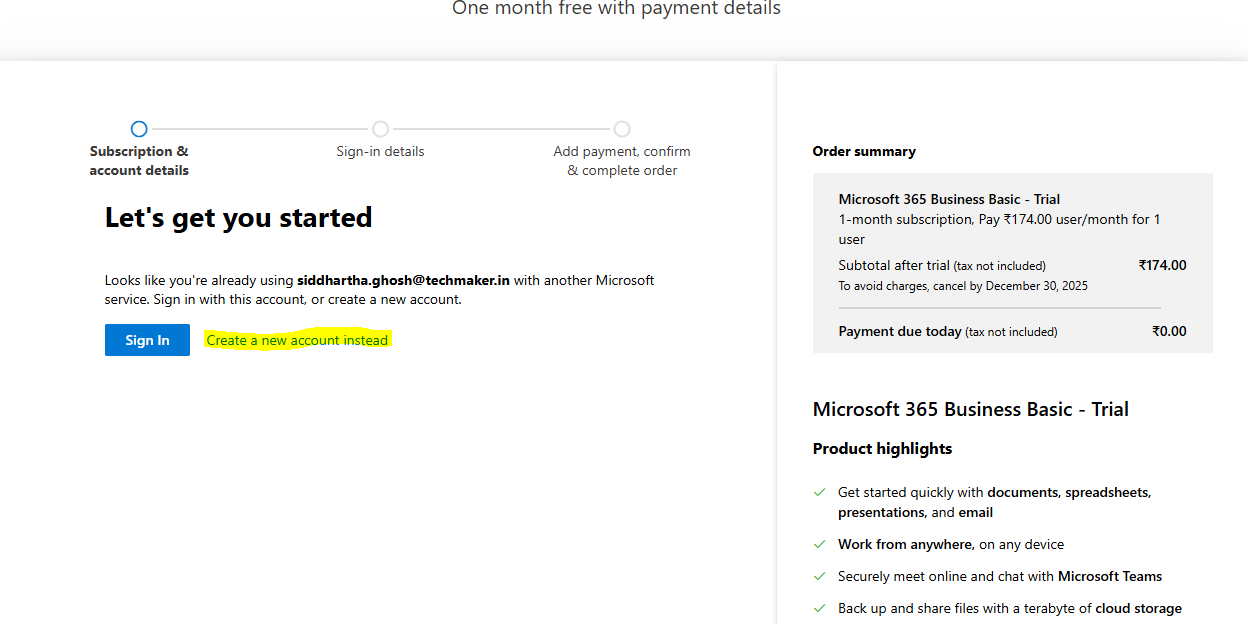 You choose:
- Create a new account instead
Why this matters
- Avoids mixing personal Microsoft IDs
- Creates a clean admin boundary
- Recommended for enterprise hygiene
This identity becomes your Global Administrator.
STEP 3 – Entering Organization & Billing Details

You are asked to enter:
- Name/Surname
- Company name / Size
- Job title
- Address
- Phone number
- Country/region
What this configures
- Tenant legal identity
- Billing profile
- Tax region
This data is reused across:
- Microsoft billing
- Compliance metadata
- Service availability
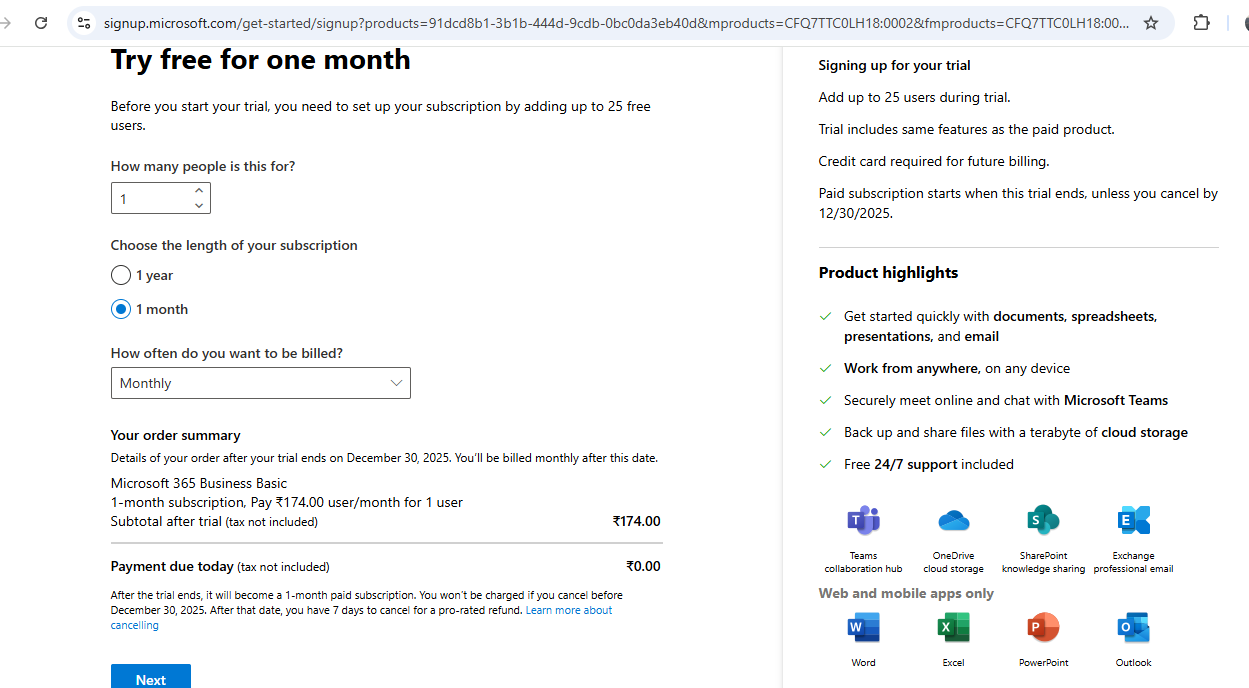
STEP 4 – Adding Payment Method
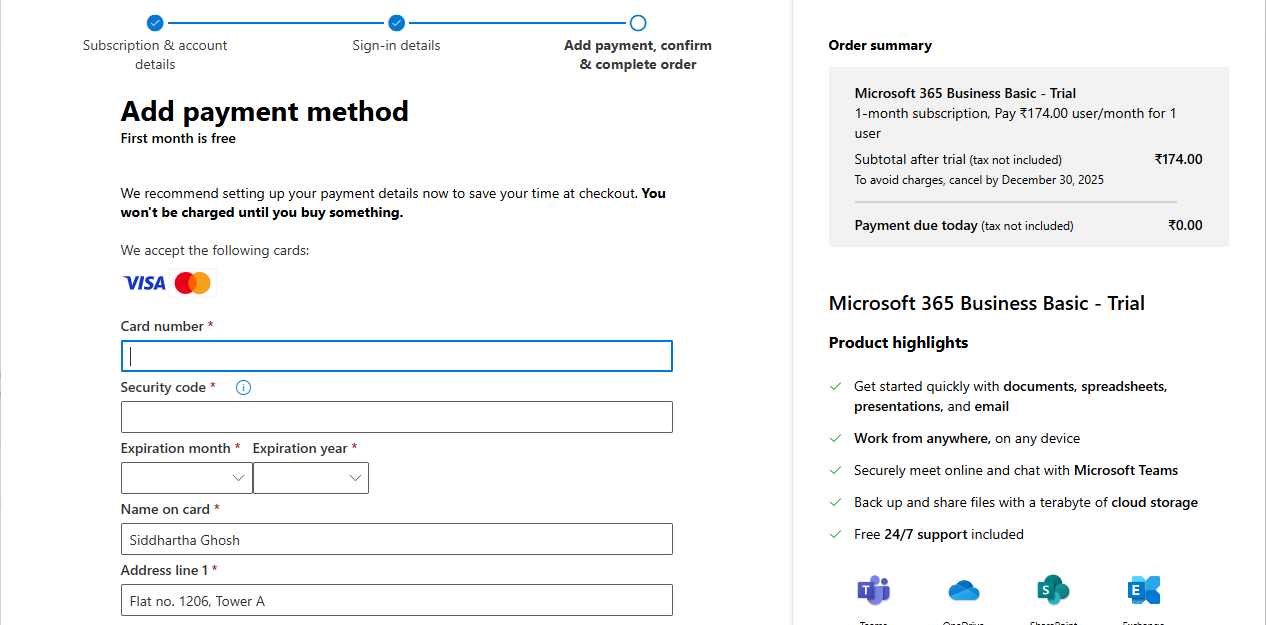
Important facts
- Card is required even for trial
- No immediate charge
- Subscription auto-renews
This is a billing enforcement checkpoint, not a payment event. You can verify how much license will cost post trial period expires.
STEP 5 – Subscription Activation Complete
In this step you will also create a login with ‘onmicrosoft.com’ domain. You might not have enabled MFA at this stage.
System state after this step
✅ Subscription = Active
✅ License pool exists
✅ Tenant services initialize asynchronously
This is the true start of a functional tenant.
STEP 6 – Microsoft 365 Admin Center → Domains
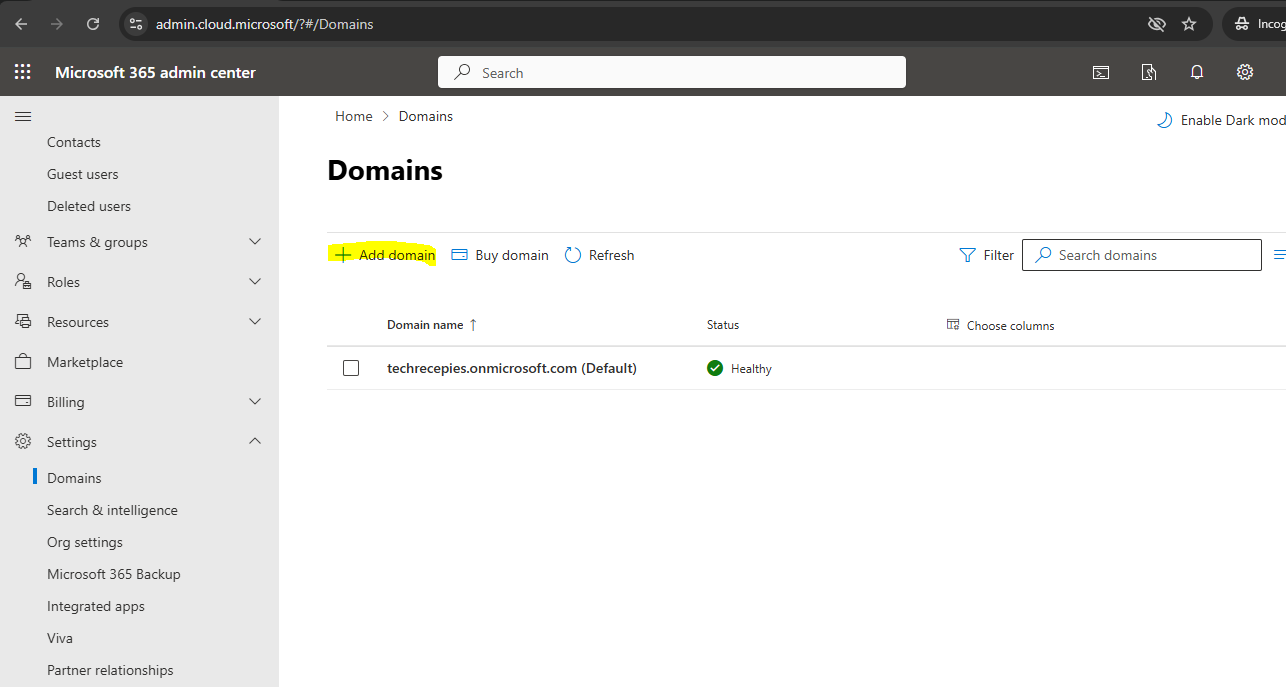
You are logged into the Microsoft 365 Admin Center. At this point you can use your email with ‘onmicrosoft.com’ domain address that you created through previous steps.
As you login, you will see that domain as default. In my case, it’s techrecepies.onmicrosoft.com.
Exact navigation
- Open browser
- Go to: https://admin.microsoft.com
-
Sign in as Global Administrator i.e. in my case it’s sighosh@techrecepies.onmicrosoft.com, but it depends in your case what you created in Step 5.
- In the left navigation pane:
- Click Settings
- Select Domains
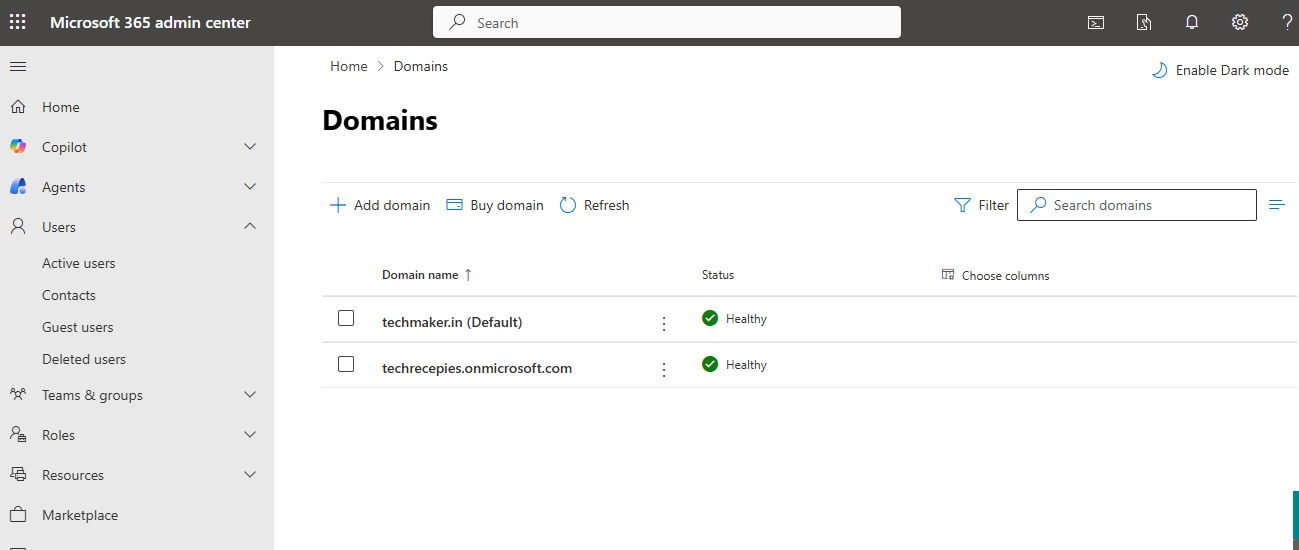
What you see on screen
- A list of domains already associated with the tenant
What this confirms technically
- ✅ The tenant already exists
- ✅ Identity namespace is active
What we are achieving in this step
We are establishing visibility into the tenant’s identity namespace.
Without this:
- You cannot create professional user identities
- You cannot receive external email
- Copilot Studio agents cannot be aligned to business identity
This step validates that we are operating inside the correct tenant boundary.
STEP 7 – Understanding the Default (onmicrosoft.com) Domain
Every Microsoft 365 tenant has a default domain in the form:
<tenant-name>.onmicrosoft.com
Important facts about this domain
- It is created automatically
- It cannot be deleted
- It is used internally by Microsoft services
Why Microsoft insists on this
- Guarantees a globally unique identity namespace
- Ensures tenant isolation
- Acts as a fallback authentication domain
What we are achieving
We fully understand:
- Which domain is system-owned
- Which domain(s) will be business-facing
This distinction becomes critical later for:
- Conditional Access
- MFA enforcement
- Copilot Studio permissions
STEP 8 – Initiating Custom Domain Addition
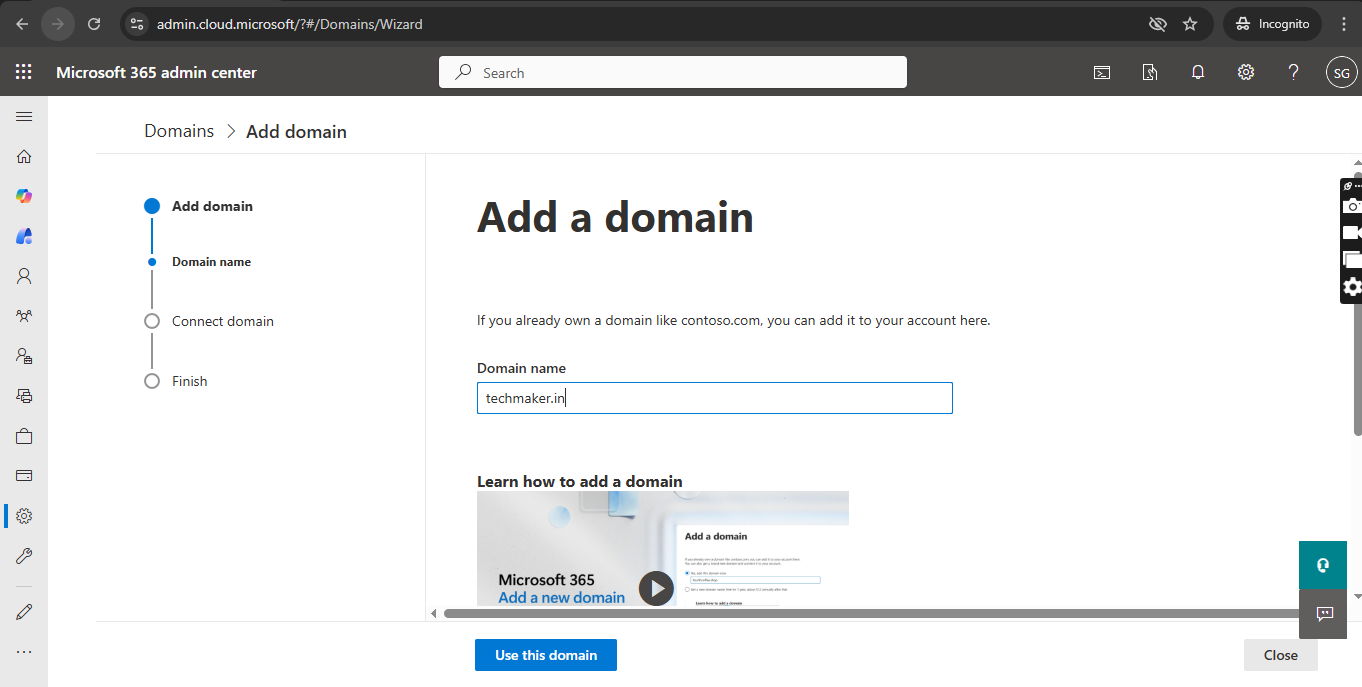
Action performed
- Click Add domain
- Enter your business domain, e.g. as below:
techmaker.in - Click Use this domain
What happens internally
- Microsoft checks for:
- Domain format validity
- Whether the domain is already claimed
- No DNS changes yet
Why this step exists
Microsoft must ensure:
- You are not claiming someone else’s domain
- Identity trust boundaries are respected
Outcome
- Domain moves into verification required state
In my case, I already own a domain ‘techmaker.in’ from GoDaddy.
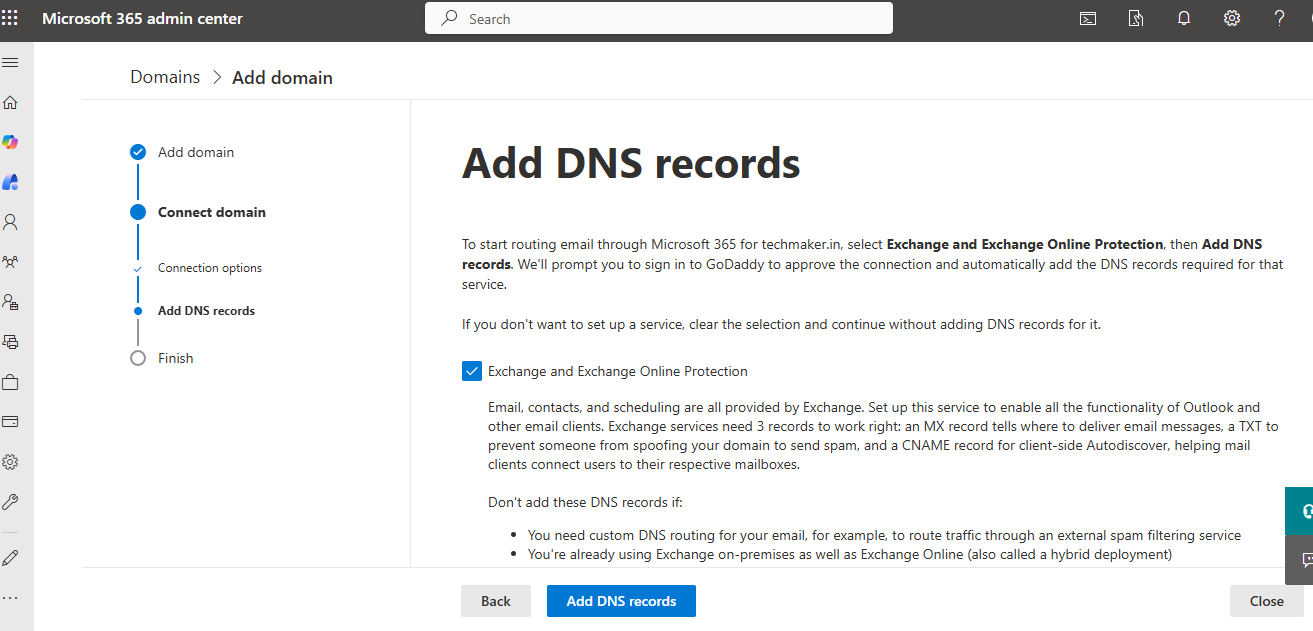
STEP 9 – Domain Ownership Verification Options
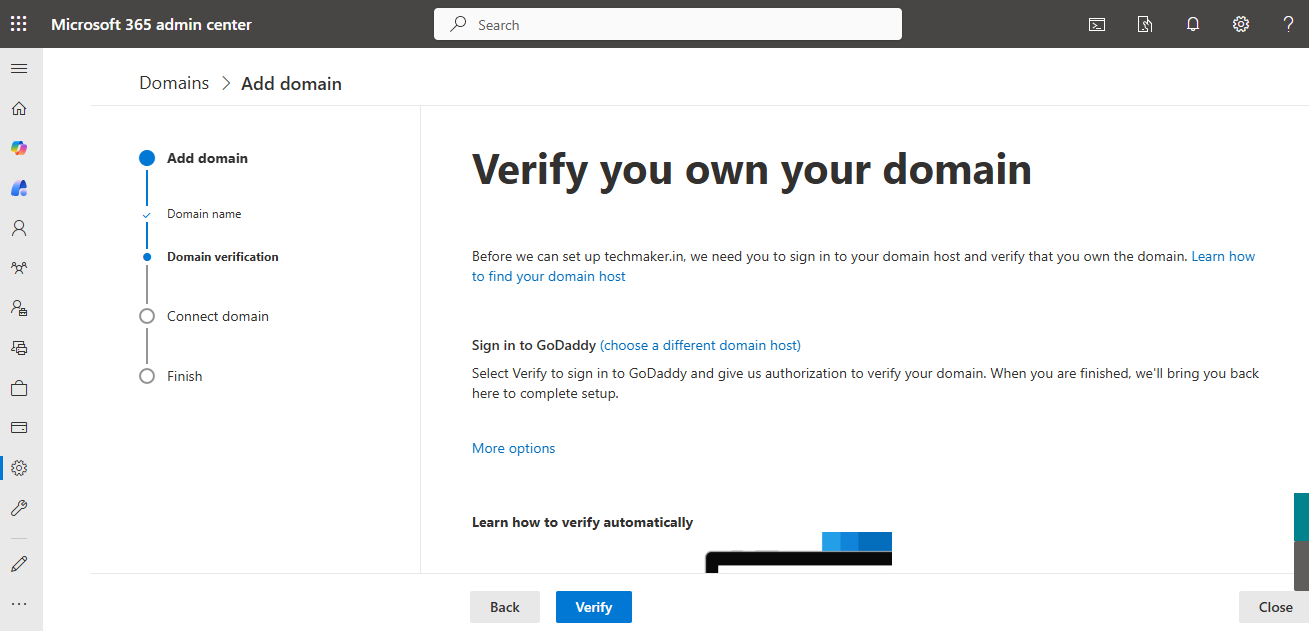
Microsoft now asks you to prove ownership.
Verification methods typically offered
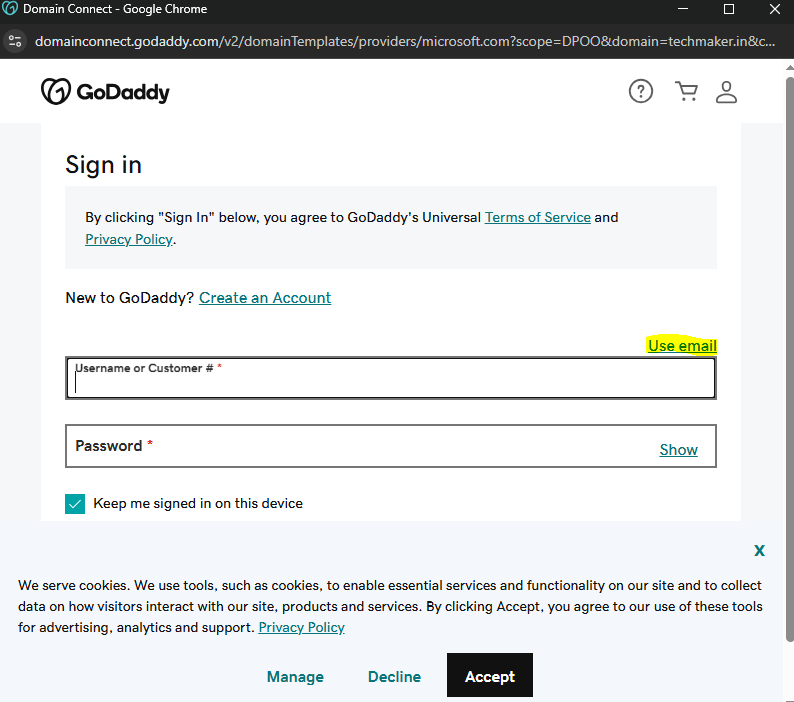
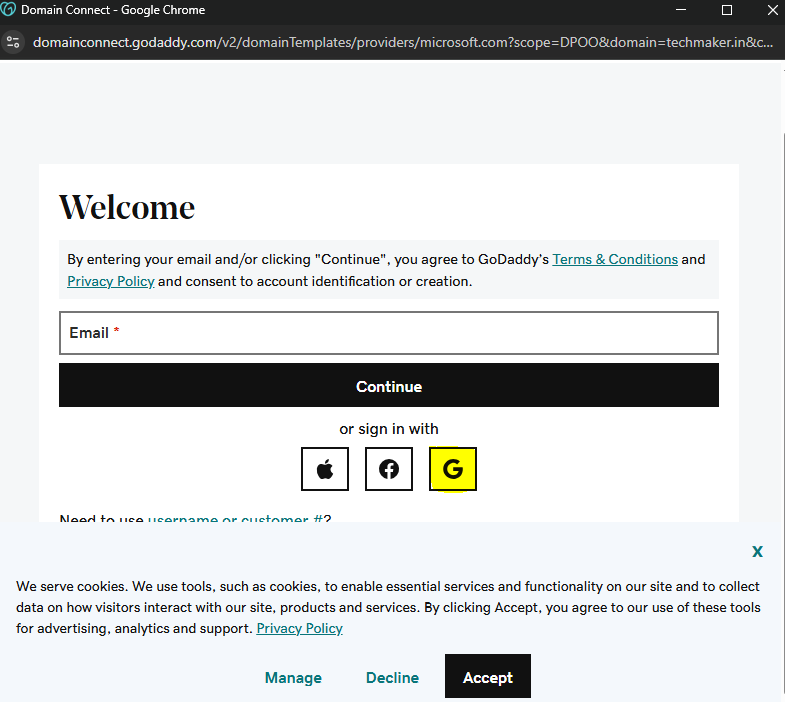
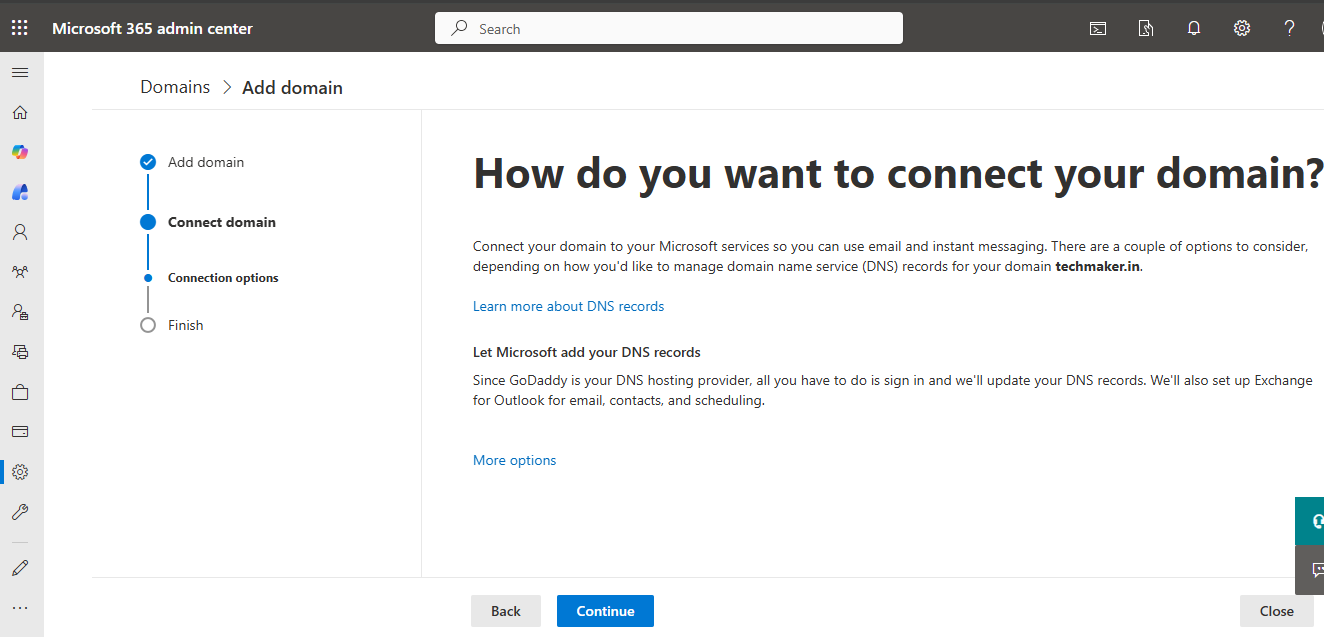
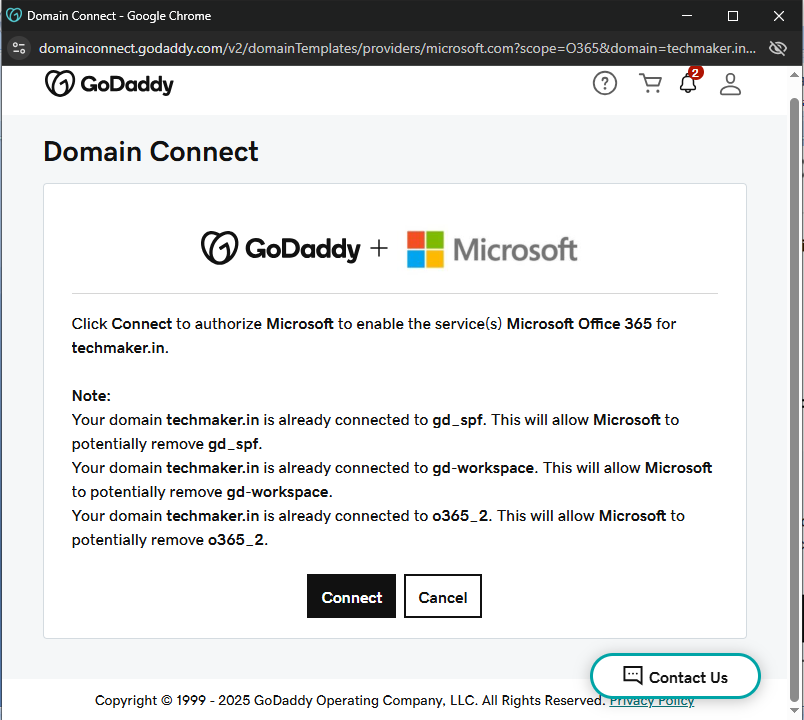
- Automatic verification (via supported registrars like GoDaddy etc.). You expect to see multiple popups and redirections to domain provider page for validation and adding records as below.
- Manual verification (TXT record)
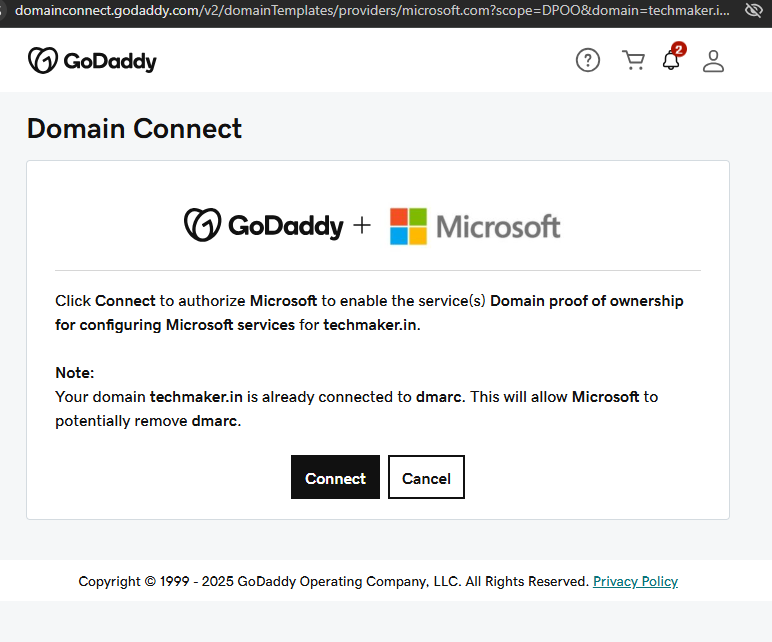
DNS Records added to Domain
- Then you will see some more popups, where we need to integrate with domain provider to add DNS record to your domain as shown below.

Best practice guidance
✅ Use automatic verification for labs and PoCs
✅ Use manual DNS for production environments
Why this is security-critical
Without ownership proof:
- Email spoofing would be trivial
- Tenant-to-tenant domain hijacking would be possible
STEP 10 – Domain Successfully Verified
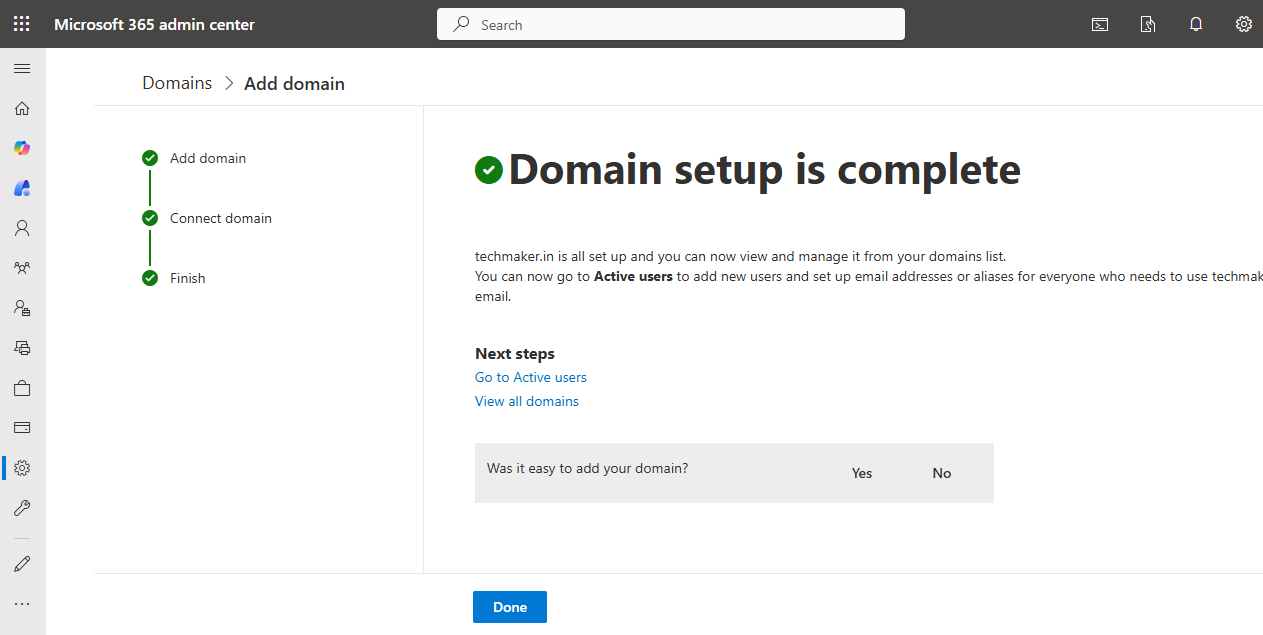
System state change
- Domain status = Verified
- Domain flagged as healthy
Now you can also see another domain added to your tennant. It will appear as default, but in case not, you have an option to make it default by right click on three dots.
What this unlocks
- Users can be created with this domain
- Email addresses are allowed
- Authentication policies can bind to the domain
⚠️ Email flow may still not work until MX records are configured.
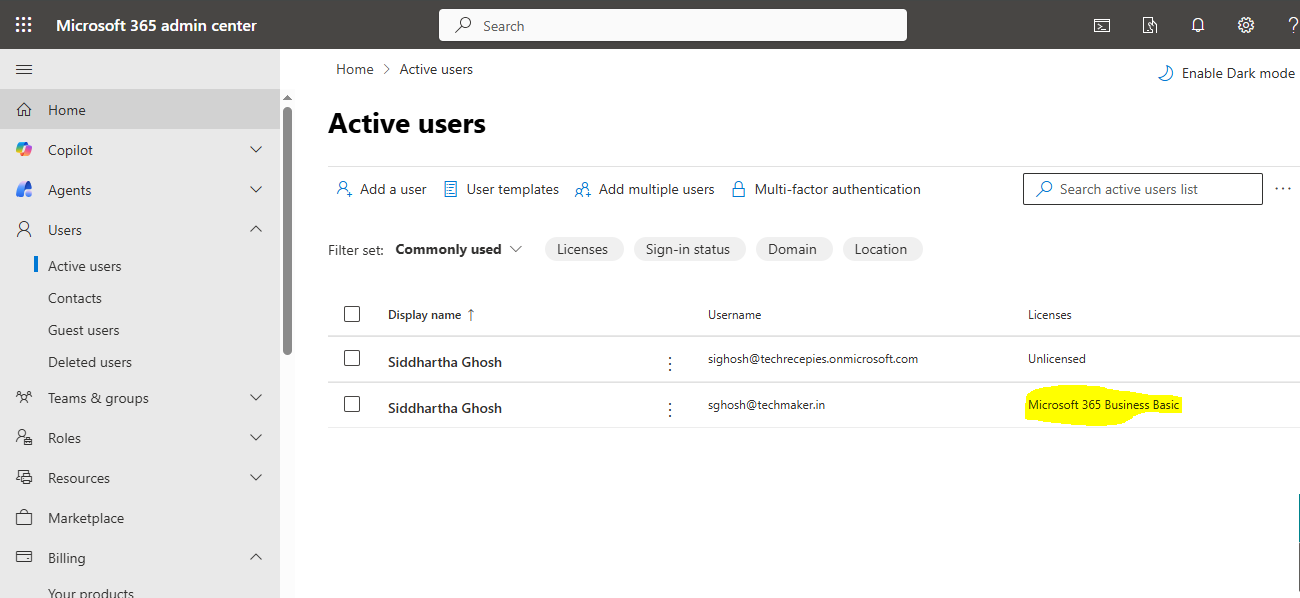
STEP 11 – Navigating to Active Users

Navigation
- Admin Center → Users → Active users
This is where human identities live.
STEP 12 – Adding a New User
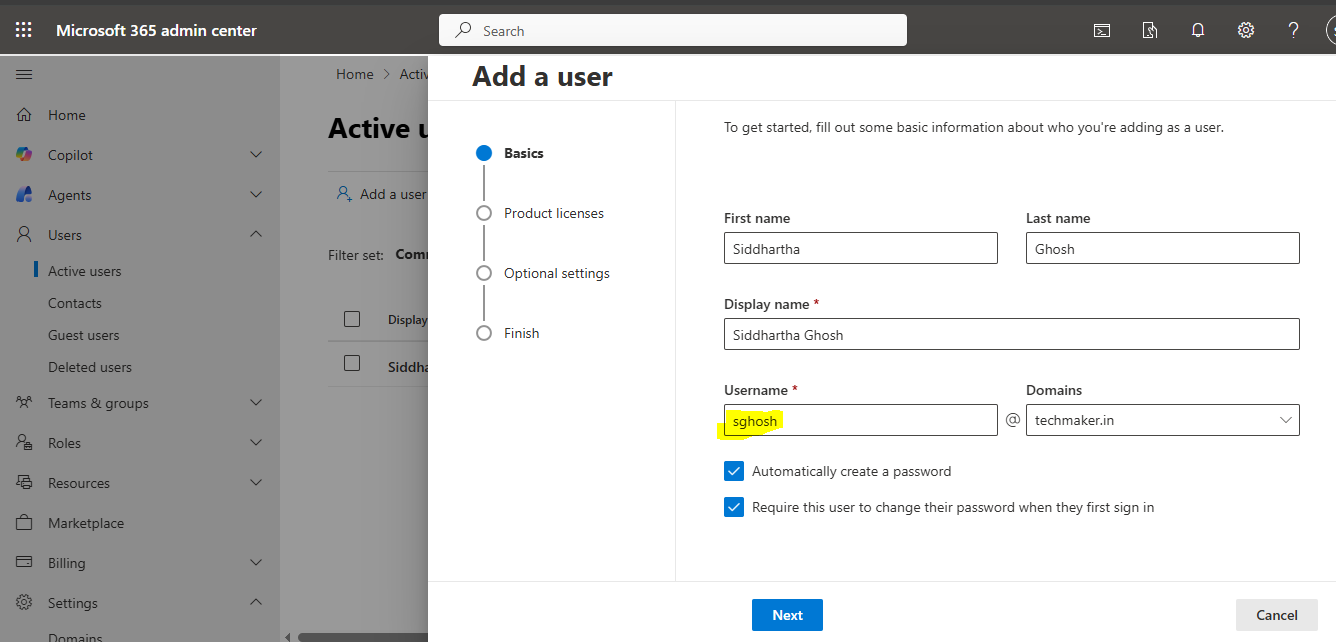
Click on Add a user.
You enter:
- First name
- Last name
- Username, and choose you domain from drop down. In this case it’s (
@techmaker.in) - As you choose both the check boxes, Temporary password is created and you can always reset it later.
This creates an identity object in Entra ID.
STEP 13 – Assigning License During Creation
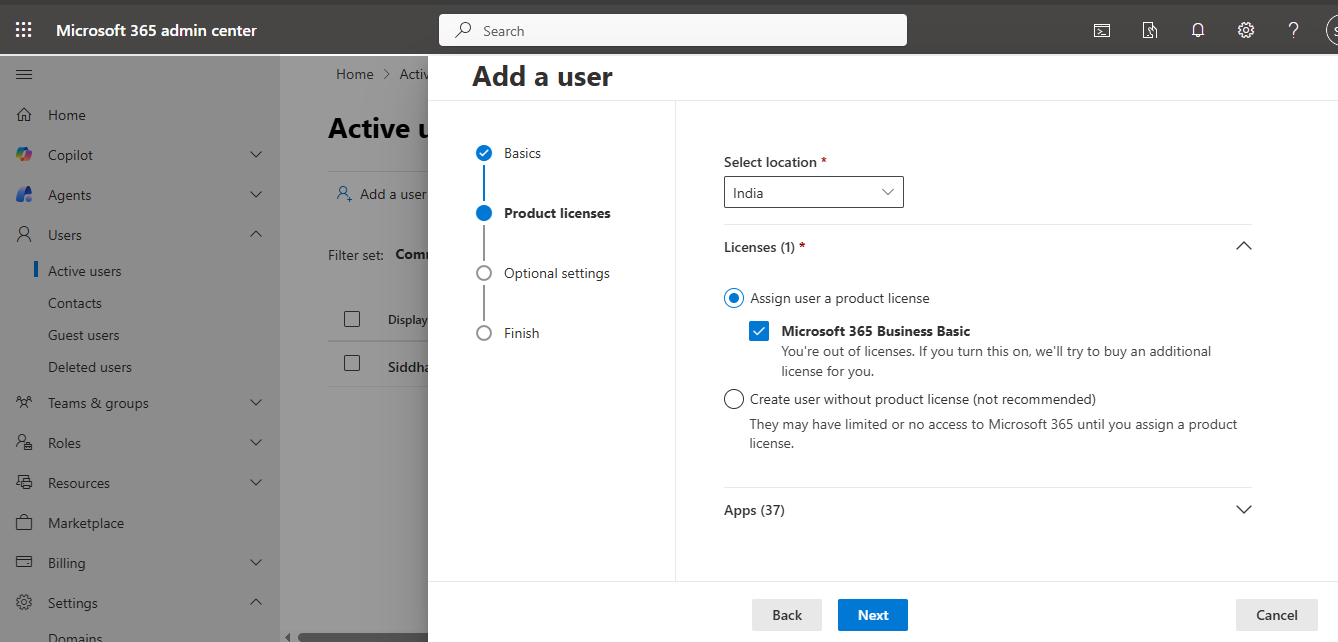
Action
- Toggle Assign license
- Select Business Basic
Why this is critical
Without a license:
- No mailbox
- No Teams
- No Copilot UI
- No Power Platform access
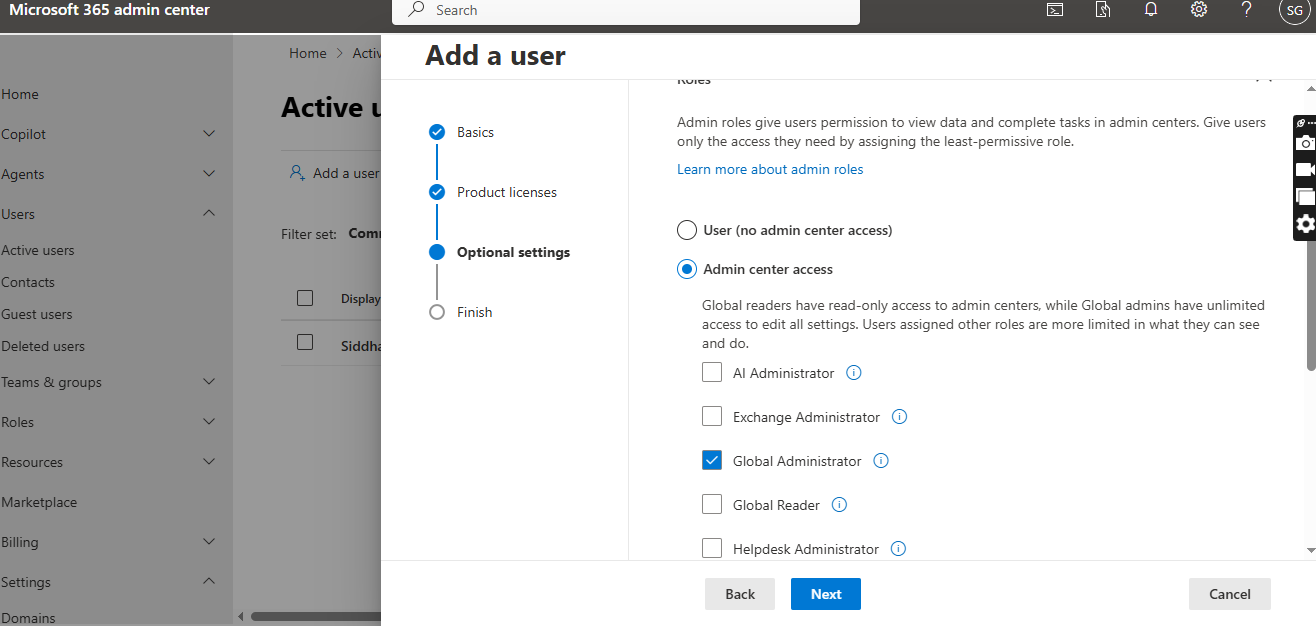
STEP 14 – Asign Roles
Assign Global Administrator role.
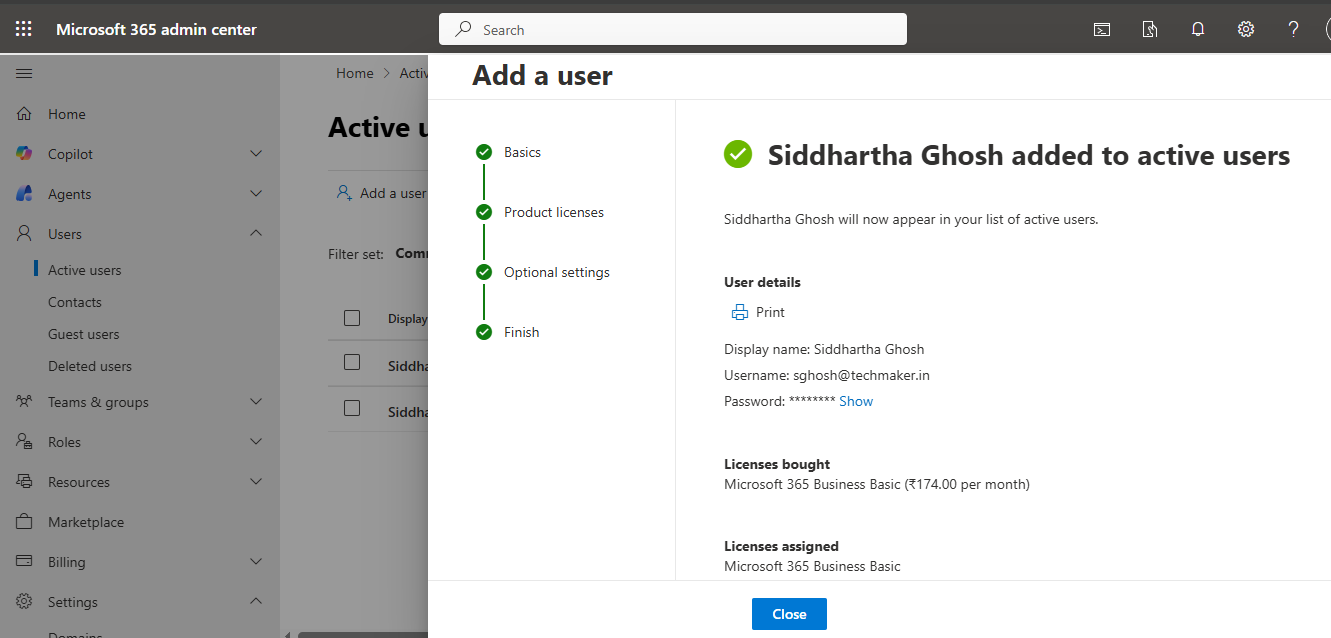
STEP 15 – User Successfully Created

Final state for this block
✅ User exists
✅ User licensed
✅ Identity ready for login
Phase 2 – User Validation, Licensing Edge Cases, and Identity Security Hardening
This phase transitions from basic user creation into:
- Resource validation (mailbox & license)
- Identity hardening using Microsoft Entra ID
- Enforcement of Multi-Factor Authentication (MFA)
All steps below build directly on the user created in Step 14.
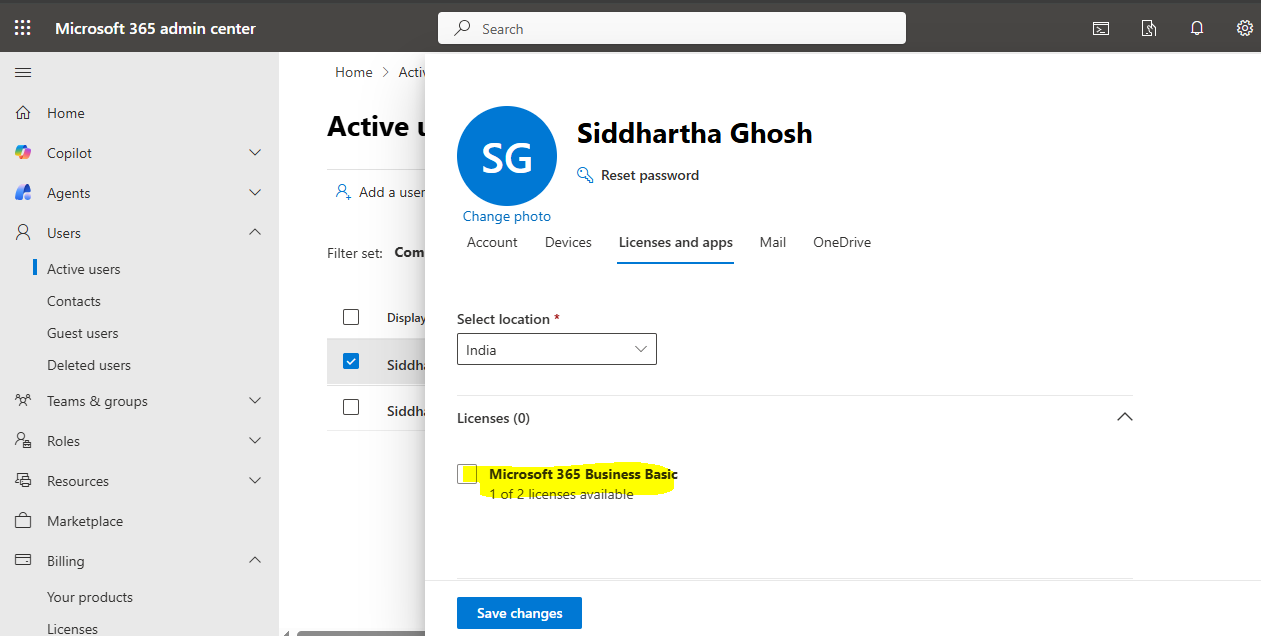
In case you see newly created user as unlicensed. You can assign the Microsoft 365 Business Basic license like below. It happens, when your licenses are basically assigned to your onmicrosoft.com domain by default.
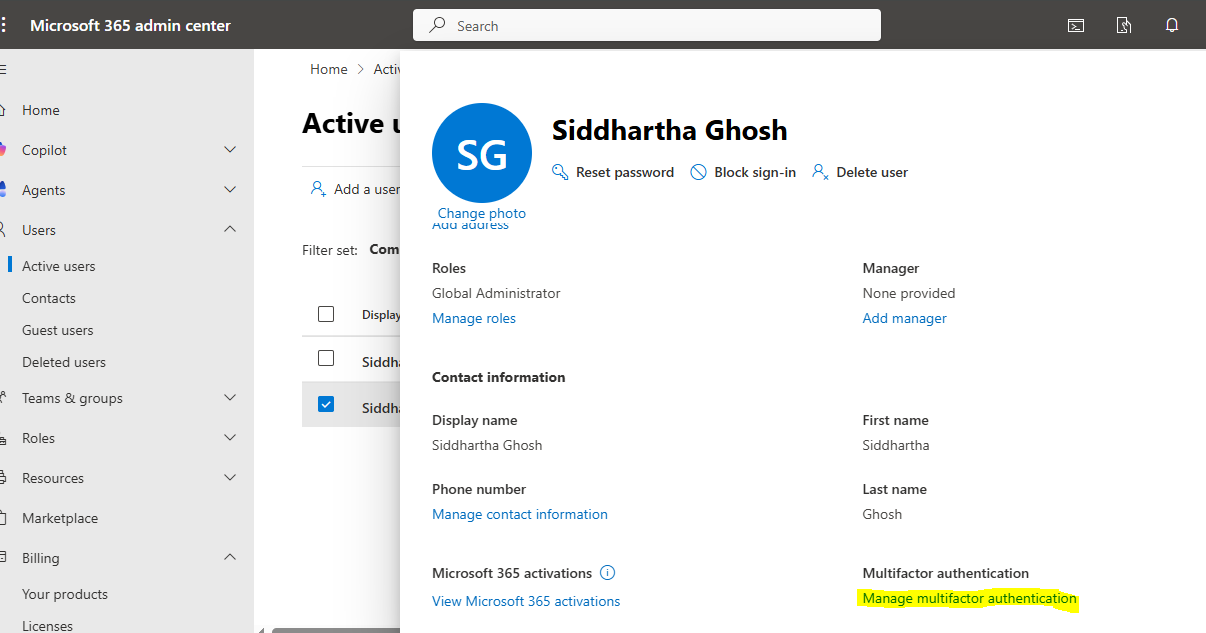
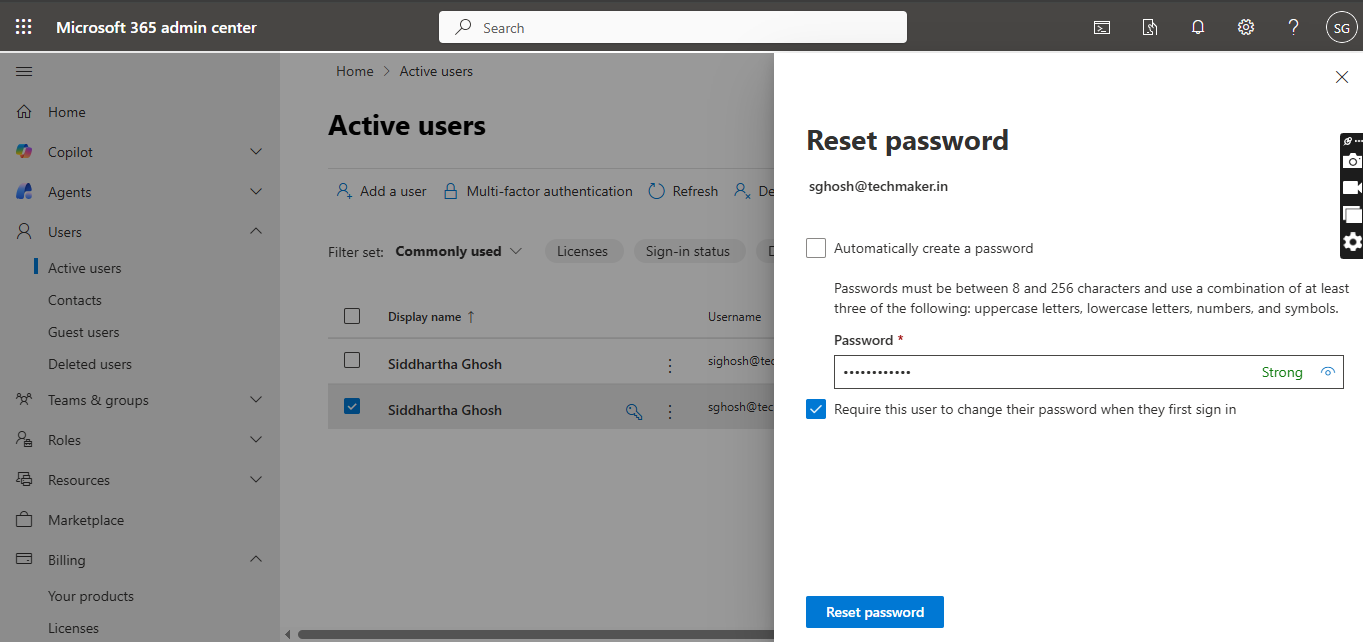
STEP 16 – Resetting User Password (Post-Creation Security Step)
Immediately after creating a new user, you should explicitly reset the password once.
Navigation
- Admin Center → Users → Active users
- Click the newly created user
- Select Reset password

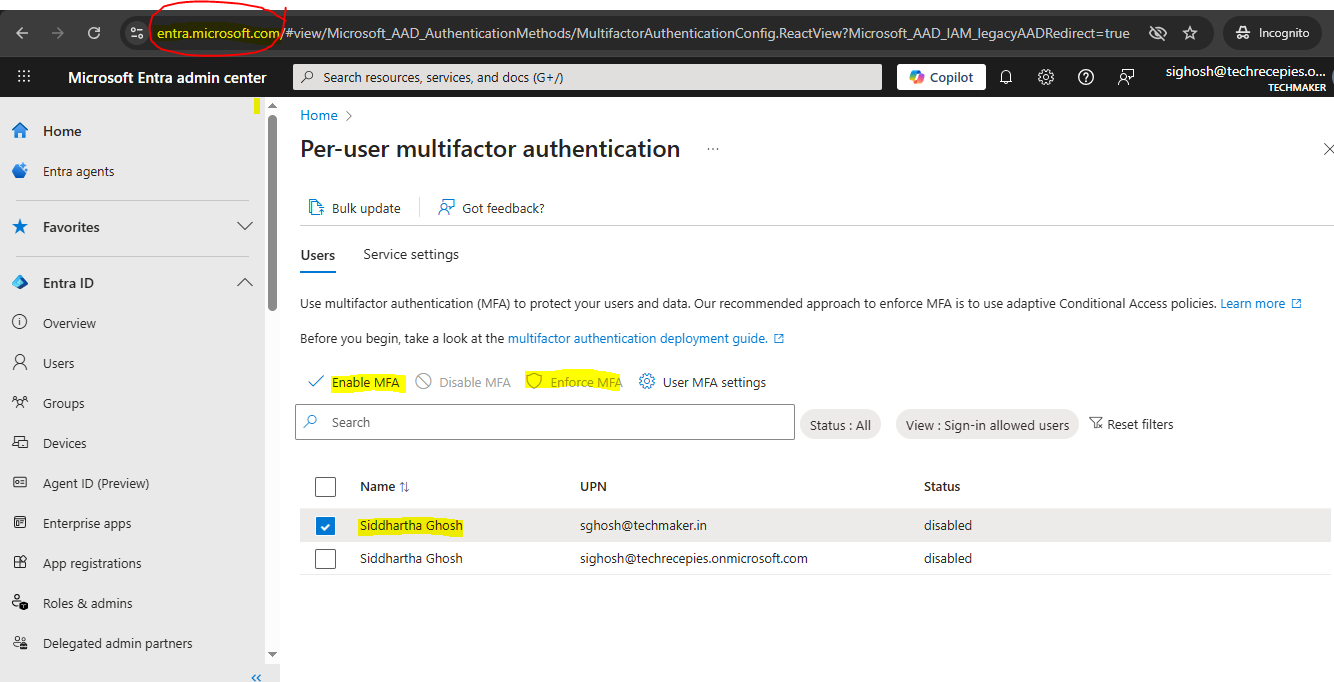
Enable MFA
- Login to Microsoft Entra, as any of the user that you created
- Select the user for which you want to enable and enforce MFA.
- Click Enable MFA and then Enforce MFA
What we are achieving
This ensures:
- No administrator-known passwords remain valid
- The user takes ownership of their credentials
- Identity hygiene before MFA is introduced
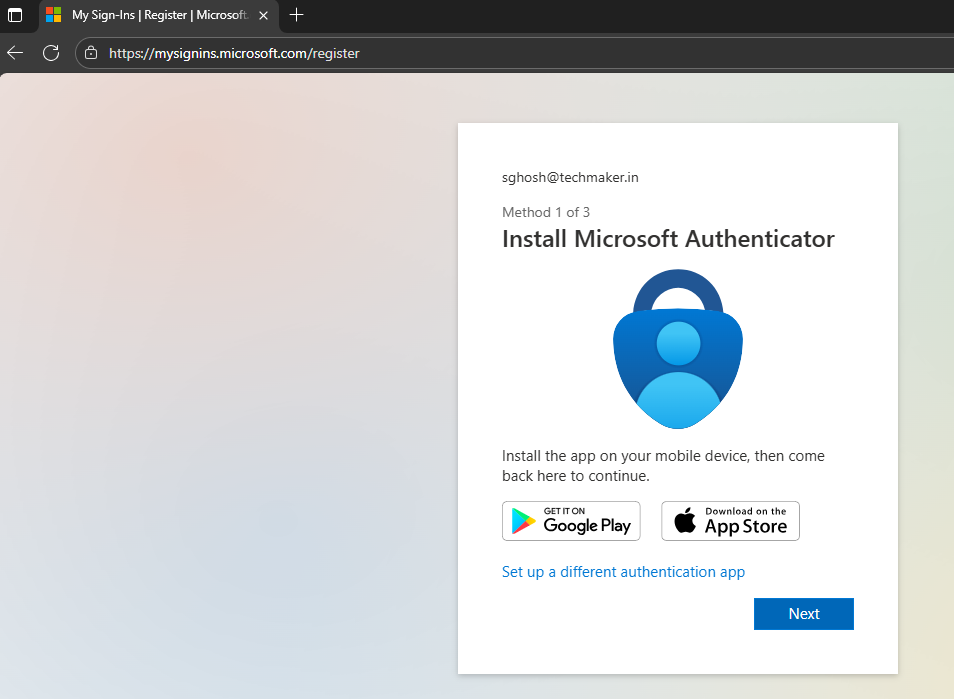
STEP 16 – First User Login and Mailbox Provisioning Verification
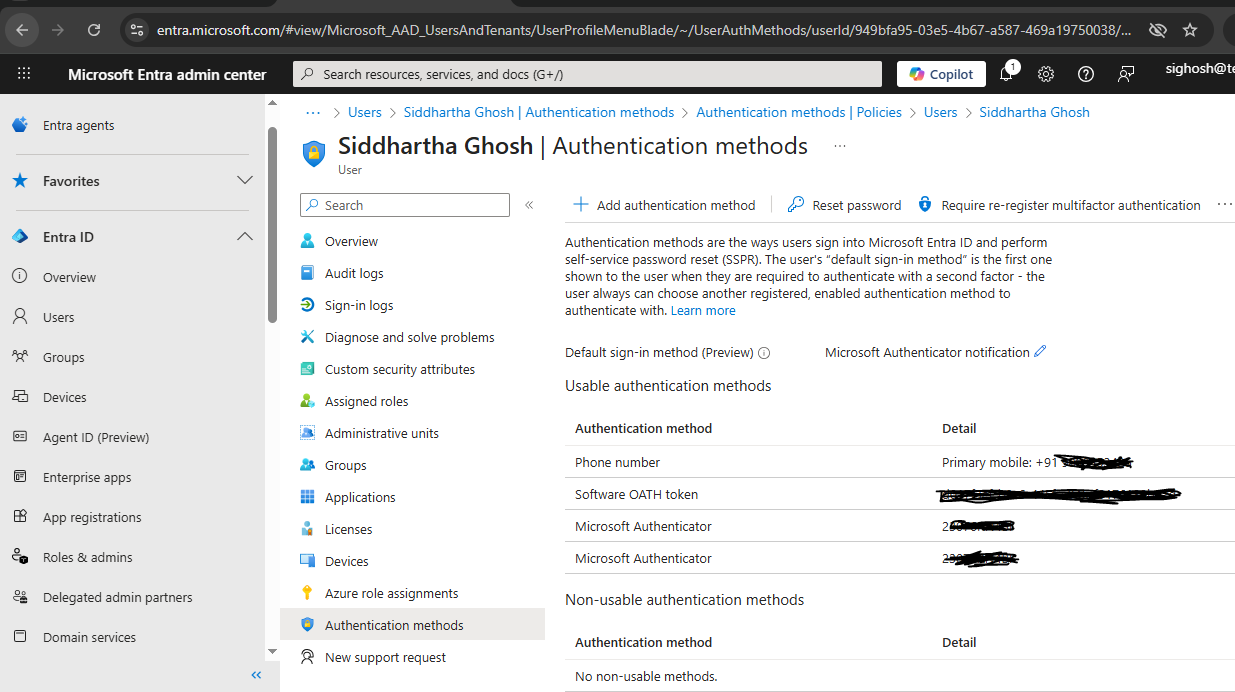
- Login to https://mysignins.microsoft.com/register, and register with MFA of your choice. In this case Microsoft Authenticator.
You can again go to Entra ID and see the user’s authentication method.
Action
- Open an incognito/private browser window
- Navigate to:
https://outlook.office.com - Sign in with:
- Username: user@techmaker.in
- Temporary password (then change it)
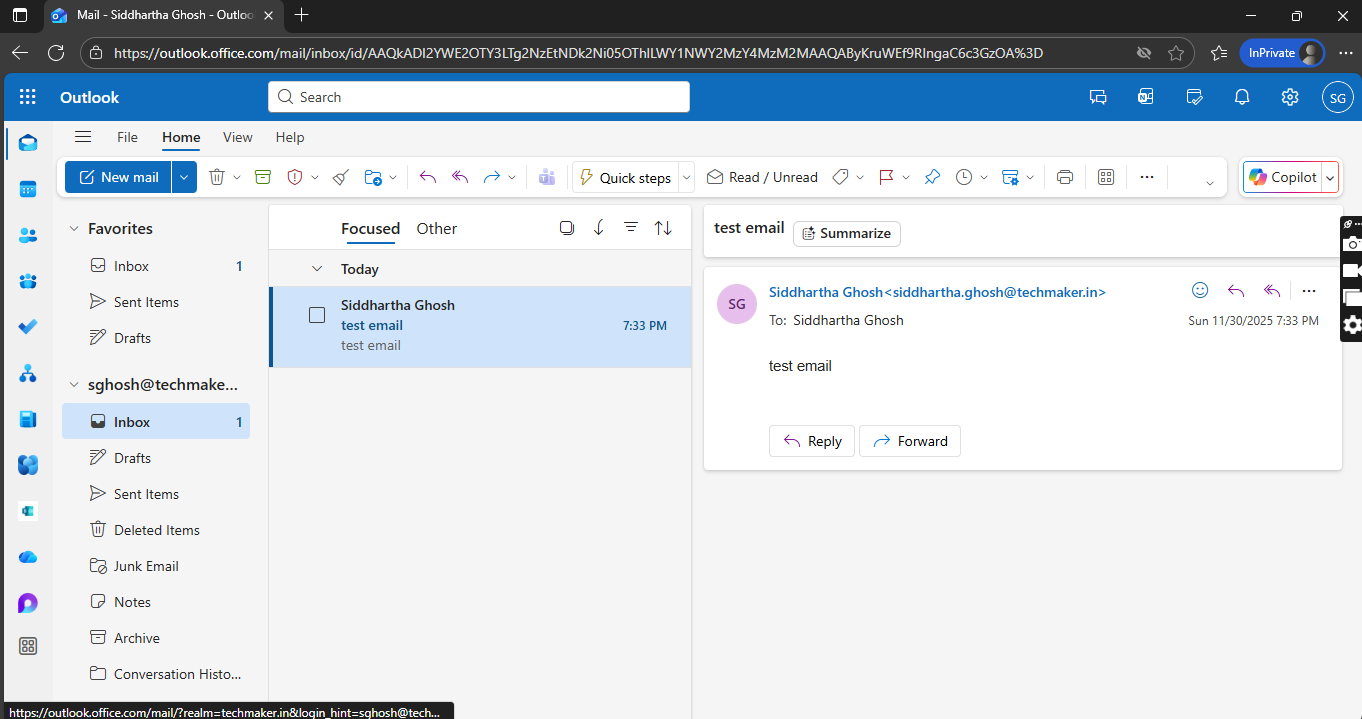
- Send a test email
What to observe
- Password change prompt
- Successful login to Outlook Web
- Inbox loads without errors
- Test mail incoming/outgoing working fine
What happens behind the scenes
- Exchange Online mailbox auto-provisions
- DNS MX records are validated
- Autodiscover bindings activate
What we are achieving
We confirm:
✅ License is valid
✅ Mailbox provisioning succeeded
✅ Domain email flow is functional
STEP 38 – Reviewing User License Assignment Again
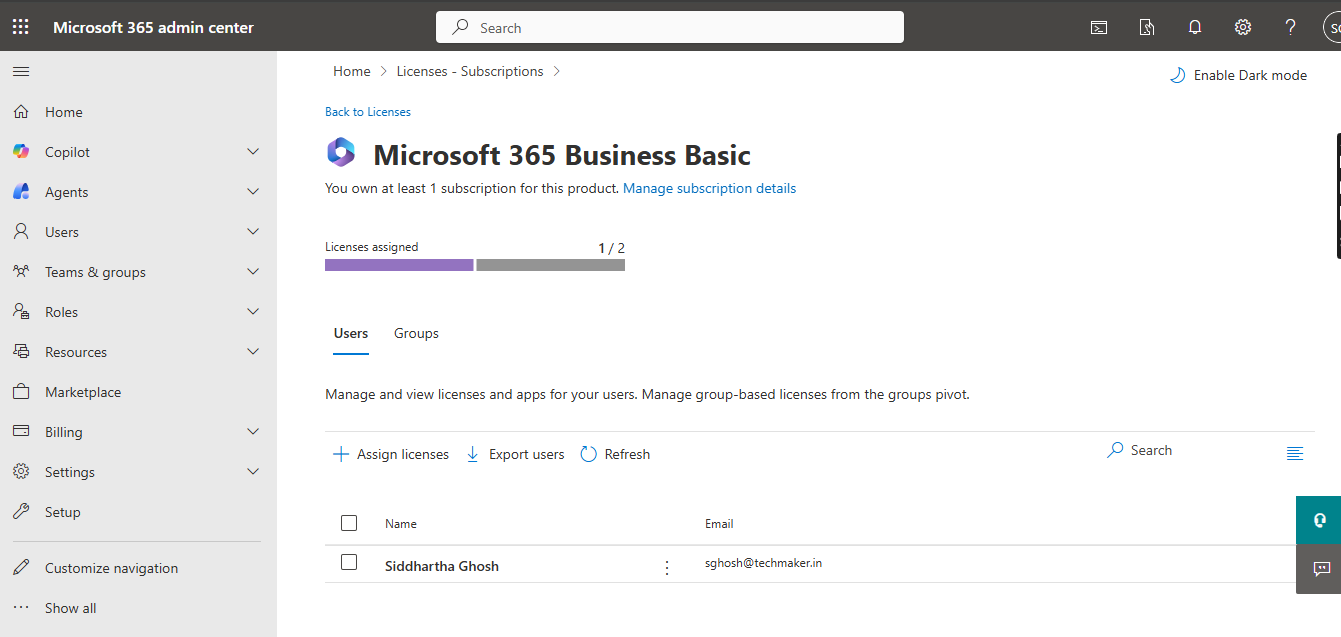
What is being verified
- User still licensed
- License not expired or suspended
Outcome
✅ License present
✅ License valid
This removes licensing ambiguity.
STEP 39 – Subscription Status Confirmation
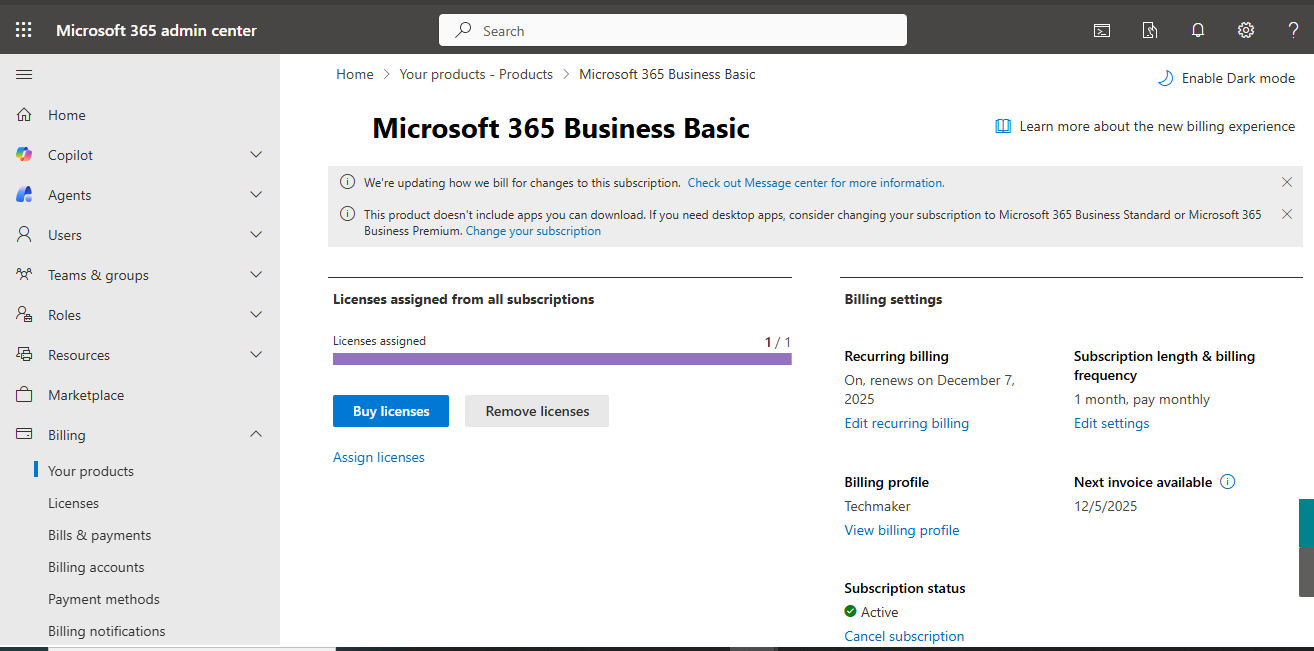
Navigation
- Admin Center → Billing → Your products
Verify
- Subscription = Active
- Trial days remaining
- Auto-renewal state
Why this matters
Expired trials silently block backend services.
Next Article: Enabling Copilot Studio End-to-End
Final Thoughts
This onboarding journey was deliberately exhaustive.
By documenting:
- Every click
- Every confirmation
-
Every error state